Drawing a Cube and Its Elements in LaTeX
Introduction
Cube shapes are often found around us. Cube-shaped objects include dice, rubik’s cubes, and cardboard. Some of the elements contained in the cube are as follows:
- A cube has 6 square sides.
- A cube has 8 vertices.
- A cube has 12 edges of the same length.
- A cube has 12 diagonal planes
- A cube has 4 diagonal spaces
- A cube has 6 diagonal faces
In this article, I will share a tutorial on how to draw a cube and its elements in .
Preamble
In the preamble we will write the document class and packages used to draw the cube elements.
\documentclass{article}\usepackage{fancybox}\usepackage{tikz}\usepackage{enumitem}Document Body
In the body of the document we start writing commands for drawing which of course start with \begin{tikzpicture} and end with \end{tikzpictue}. Pay attention to the following code command.
\begin{document}\begin{tikzpicture}[thick,scale=5]\end{tikzpicture}\end{document} Drawing Corner Points
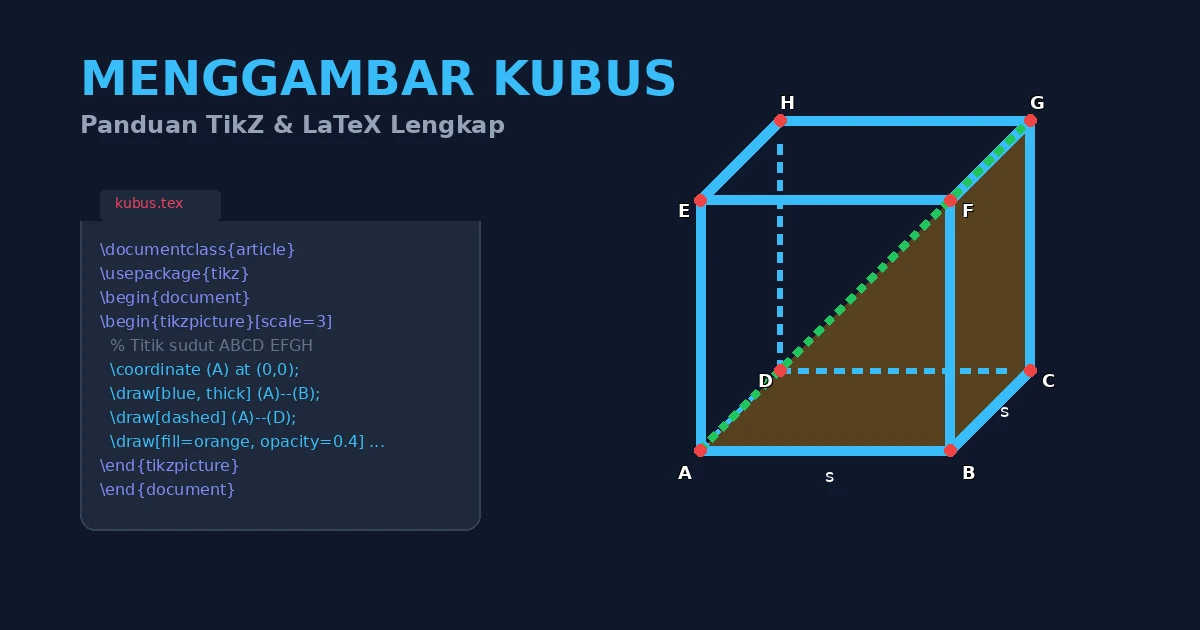
Here, the cube to be drawn is a cube ABCD EFGH. The code is as follows.
\coordinate [label=below:{\color{red}$A$}](A) at (0, 0); \coordinate [label=below:{\color{red}$B$}](B) at (1, 0); \coordinate [label=right:{\color{red}$C$}](C) at (1.3, 0.3); \coordinate [label=left:{\color{red}$D$}](D) at (0.3, 0.3); \coordinate [label=left:{\color{red}$E$}](E) at (0, 1); \coordinate [label=right:{\color{red}$F$}](F) at (1, 1); \coordinate [label=above:{\color{red}$G$}](G) at (1.3, 1.3); \coordinate [label=above:{\color{red}$H$}](H) at (0.3, 1.3)Drawing Cube Side Symbols
Cube side symbols generally use the lowercase S symbol (s).
\coordinate[label=below:$s$](s) at (0.5, 0); \coordinate[label=right:$s$] (s) at (1.15, 0.15); \coordinate[label=right:$s$] (s) at (1.3, 0.8);Drawing Ribs
Next we will draw the edges of the cube *ABCD EFGH. *Ribs This will connect the corner points on the cube.
\draw[blue, very thick] (A) -- (E); \draw[blue, very thick] (E) -- (F); \draw[blue, very thick] (B) -- (F); \draw[blue, very thick] (A) -- (B); \draw[blue, dashed] (A) -- (D); \draw[blue, dashed] (D) -- (H); \draw[blue, very thick] (E) -- (H); \draw[blue, very thick] (G) -- (H); \draw[blue, very thick] (F) -- (G); \draw[blue, very thick] (B) -- (C); \draw[blue, very thick] (C) -- (G); \draw[blue, dashed] (C) -- (D);At this point, if we compile the document script, the results will look like the following image.

Drawing Plane/Side Diagonals
Diagonal planes/sides of a cube *ABCD EFGH *there are 12, namely: AC, BD, EG, F H, AH, ED, BG, CF, AF, BE, CH, DG. The command to draw it can be seen in the following code.
\draw[red, dashed] (A) -- (C); \draw[red, dashed] (B) -- (D); \draw[red, dashed] (E) -- (G); \draw[red, dashed] (F) -- (H); \draw[red, dashed] (A) -- (H); \draw[red, dashed] (E) -- (D); \draw[red, dashed] (B) -- (G); \draw[red, dashed] (C) -- (F); \draw[red, dashed] (A) -- (F); \draw[red, dashed] (B) -- (E); \draw[red, dashed] (C) -- (H); \draw[red, dashed] (D) -- (G);Drawing Space Diagonals
The diagonal of the space to be drawn is diagonal AG, BH, CE, DA DF. \draw[green, dashed] (A) – (G); \draw[green, dashed] (B) – (H); \draw[green, dashed] (C) – (E); \draw[green, dashed] (D) – (F);
Drawing Diagonal Planes
Diagonal plane of a cube ABCD EFGH there are 6 pieces, namely:* ACGE, BDHF, ABGH, CDEF, ADGF, BCHE*.
\draw[dashed, fill=green, opacity=0.5] (B) -- (C) -- (H) --(E); \draw[dashed, fill=orange, opacity=0.5] (A) -- (B) -- (G) --(H); \draw[dashed, fill=blue, opacity=0.5] (A) -- (C) -- (G) --(E); \draw[dashed, fill=blue, opacity=0.5] (B) -- (D) -- (H) --(F); \draw[dashed, fill=blue, opacity=0.5] (C) -- (D) -- (E) --(F); \draw[dashed, fill=blue, opacity=0.5] (A) -- (D) -- (G) --(F);Complete Code
For the complete code, I deliberately added several command codes as information about the cube image.
\documentclass{article}\usepackage{fancybox}\usepackage{tikz}\usepackage{enumitem}\title{Unsur-Unsur Kubus}\author{Aan Triono}\date{\today}\parindent0em\begin{document}\maketitle\centering\textcolor{blue!75}{\shadowbox{KUBUS}}\vspace{.3 cm}\begin{tikzpicture}[thick,scale=5]% ~~~~~~~~~~~ Menggambar titik sudut ~~~~~~~~~~~ \coordinate [label=below:{\color{red}$A$}](A) at (0, 0); \coordinate [label=below:{\color{red}$B$}](B) at (1, 0); \coordinate [label=right:{\color{red}$C$}](C) at (1.3, 0.3); \coordinate [label=left:{\color{red}$D$}](D) at (0.3, 0.3); \coordinate [label=left:{\color{red}$E$}](E) at (0, 1); \coordinate [label=right:{\color{red}$F$}](F) at (1, 1); \coordinate [label=above:{\color{red}$G$}](G) at (1.3, 1.3); \coordinate [label=above:{\color{red}$H$}](H) at (0.3, 1.3); % ~~~~~~~~~~~~~~~ Menggambar Simbol sisi ~~~~~~~~~~~~~~~~~ \coordinate[label=below:$s$](s) at (0.5, 0); \coordinate[label=right:$s$] (s) at (1.15, 0.15); \coordinate[label=right:$s$] (s) at (1.3, 0.8); %\coordinate[label=below:$.$] (Z) at (1, 0.47); %---------------Rusuk---------------- \draw[blue, very thick] (A) -- (E); \draw[blue, very thick] (E) -- (F); \draw[blue, very thick] (B) -- (F); \draw[blue, very thick] (A) -- (B); \draw[blue, dashed] (A) -- (D); \draw[blue, dashed] (D) -- (H); \draw[blue, very thick] (E) -- (H); \draw[blue, very thick] (G) -- (H); \draw[blue, very thick] (F) -- (G); \draw[blue, very thick] (B) -- (C); \draw[blue, very thick] (C) -- (G); \draw[blue, dashed] (C) -- (D); %~~~~~~~~~~~~ Diagonal Bidang/Sisi ~~~~~~~~~~~ \draw[red, dashed] (A) -- (C); \draw[red, dashed] (B) -- (D); \draw[red, dashed] (E) -- (G); \draw[red, dashed] (F) -- (H); \draw[red, dashed] (A) -- (H); \draw[red, dashed] (E) -- (D); \draw[red, dashed] (B) -- (G); \draw[red, dashed] (C) -- (F); \draw[red, dashed] (A) -- (F); \draw[red, dashed] (B) -- (E); \draw[red, dashed] (C) -- (H); \draw[red, dashed] (D) -- (G); %~~~~~~~~~~ Diagonal Ruang ~~~~~~~~~~~~ \draw[green, dashed] (A) -- (G); \draw[green, dashed] (B) -- (H); \draw[green, dashed] (C) -- (E); \draw[green, dashed] (D) -- (F); % ~~~~~~~~~~~ Bidang Diagonal~~~~~~~~~~~~~~~ \draw[dashed, fill=green, opacity=0.5] (B) -- (C) -- (H) --(E); \draw[dashed, fill=orange, opacity=0.5] (A) -- (B) -- (G) --(H); %\draw[dashed, fill=blue, opacity=0.5] (A) -- (C) -- (G) --(E); %\draw[dashed, fill=blue, opacity=0.5] (B) -- (D) -- (H) --(F); %\draw[dashed, fill=blue, opacity=0.5] (C) -- (D) -- (E) --(F); %\draw[dashed, fill=blue, opacity=0.5] (A) -- (D) -- (G) --(F); \end{tikzpicture}\vspace{0.5cm}Unsur-unsur kubus :\begin{itemize} \item Bidang : $ABCD, EFGH, ADHE, BCGF, DCGH.$ \item Rusuk : $\overline{AB}, \overline{BC}, \overline{CD}, \overline{AD}, \overline{EF}, \overline{FG}, \overline{GH}, \overline{EH}, \overline{AE}, \overline{BF}, \overline{CG}, \overline{DH}.$ \item Titik sudut : $A, B, C. D, F, G, H.$ \item Diagonal sisi : $AC, BD, EG, FH, AH, ED, BG, CF, AF, BE, CH, DG.$ \item Diagonal ruang : $AG, BH, CE, DF.$ \item Bidang diagonal : $ACGE, BDHF, ADGF, BCHE, CDEF, ABGH.$\end{itemize}\fcolorbox{red}{blue!40}{Luas permukaan kubus, $L=6s^2$} dan \fcolorbox{red}{blue!40}{Volume kubus, $V=s^3$}\end{document}You can compile these codes and see the results using the LaTeX engine on this blog. Please try here
. The results of compiling the document script will look like the image in the following document.
Closing
That’s how to draw a cube and its elements in LaTeX. Of course, not all elements are written or described here. You can develop it more fully. If there are errors, please correct them, and if you have input, please leave them in the comments. I hope this is helpful.